
- Global Multi-region Azure P2S VPN with Azure AD Authentication - 4. January 2023
- Mein Blog - 10. May 2020

Step-by-Step: Create a global multi-region Azure Virtual WAN Point-to-Site (P2S) Always On VPN setup for your remote users with built-in Azure AD authentication and use Intune to deploy the Azure VPN Client with its VPN Profile.
In this blog post, I want to show you how you can create a global scalable multi-region Azure P2S VPN setup with Azure AD Authentication and how you use Intune for the deployment. You can easily use the Azure Virtual WAN technology for your remote users to spread your VPN network around the globe. You can deploy the VPN endpoints on each region where your remote users are located. The VPN connects the users automatically to the nearest endpoint with the integrated Azure AD authentication by using the global traffic manager from Microsoft. I would like to show you as well how you can automate your setup to deploy the azure VPN client and its needed configuration to your remote users. This setup is an awesome solution because of its flexibility and scalability. You can leverage certain high availability capabilities which is integrated by nature in Azure Virtual WAN.
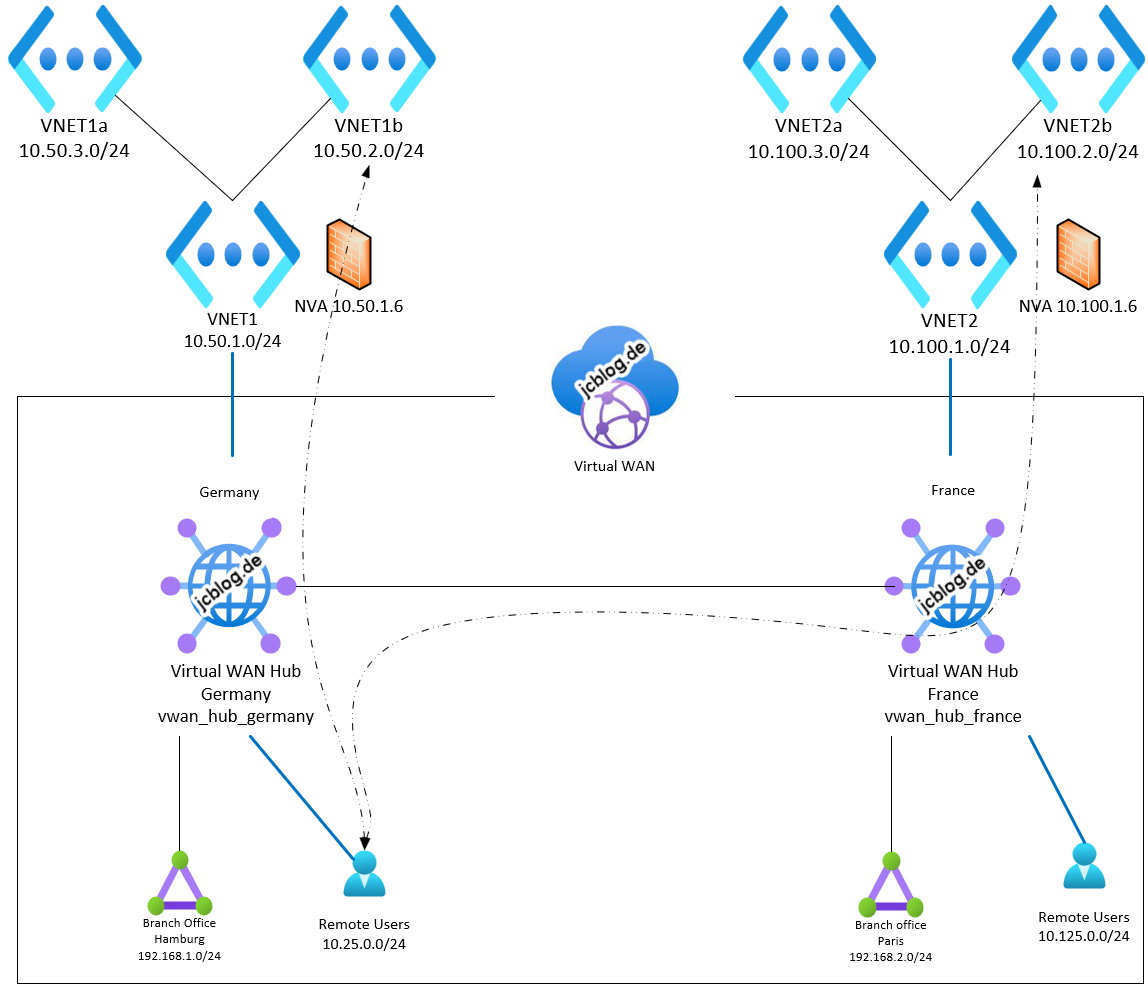
Overview of this architecture:
Requirements for this setup
- Azure Subscription with configured VNETs for building up the infrastructure
- Intune Licenses for deploying the Azure VPN Client and the VPN configuration
- Network Virtual Appliance for routing the traffic securely through a firewall
- Azure AD Premium 1 for using conditional access
Azure VPN Enterprise App
You must enable Azure AD Authentication for the Virtual WAN. Hence you must add a specific Enterprise App and grant consent to it. To do this you should open one of the following URL’s which is depending on the current type of tenant you are using.
Public: https://login.microsoftonline.com/common/oauth2/authorize?client_id=41b23e61-6c1e-4545-b367-cd054e0ed4b4&response_type=code&redirect_uri=https://portal.azure.com&nonce=1234&prompt=admin_consent
Azure Gov: https://login.microsoftonline.us/common/oauth2/authorize?client_id=51bb15d4-3a4f-4ebf-9dca-40096fe32426&response_type=code&redirect_uri=https://portal.azure.us&nonce=1234&prompt=admin_consent
Azure Germany: https://login-us.microsoftonline.de/common/oauth2/authorize?client_id=538ee9e6-310a-468d-afef-ea97365856a9&response_type=code&redirect_uri=https://portal.microsoftazure.de&nonce=1234&prompt=admin_consent
Azure China: https://login.chinacloudapi.cn/common/oauth2/authorize?client_id=49f817b6-84ae-4cc0-928c-73f27289b3aa&response_type=code&redirect_uri=https://portal.azure.cn&nonce=1234&prompt=admin_consent
- Open the URL which belongs to your type of tenant and logon with a Global Admin account.
- Accept the requested permissions.
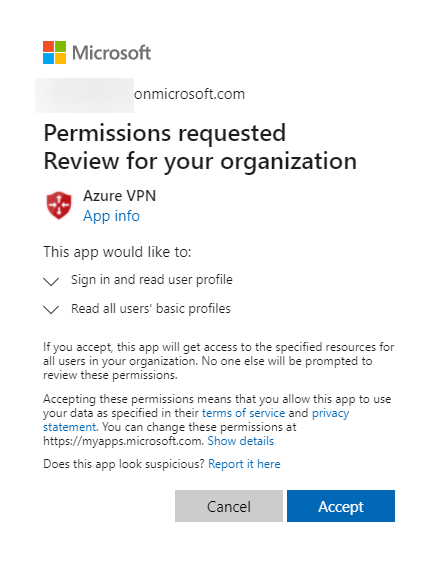
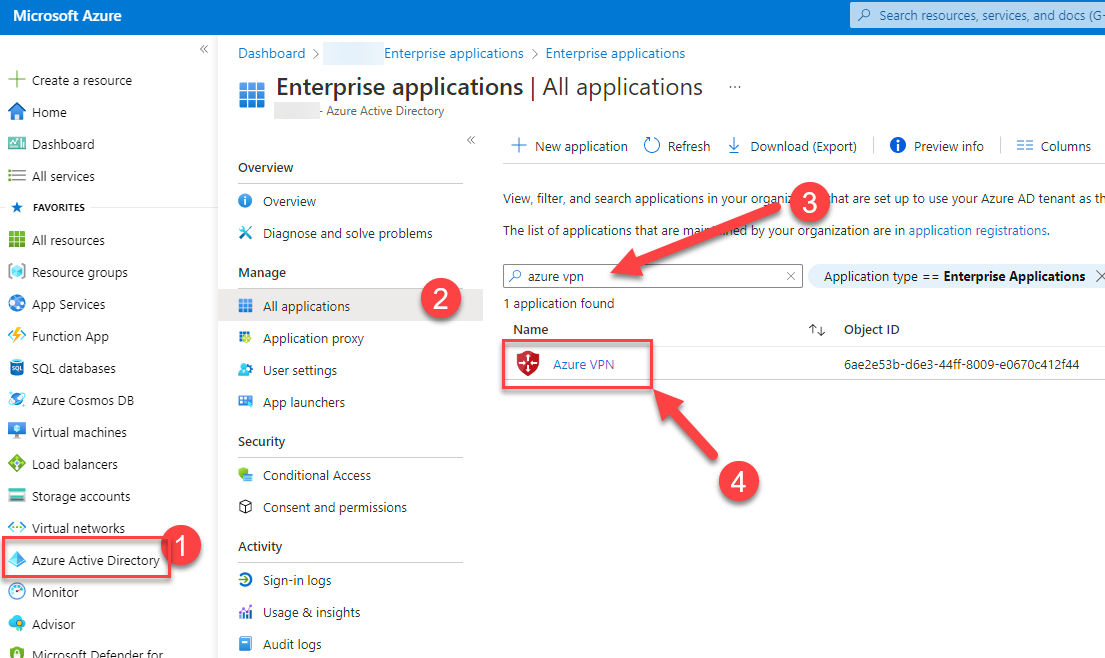
Once accepted, you should see the following Enterprise App in the Azure portal. Copy the application ID (41b23e61-6c1e-4545-b367-cd054e0ed4b4). This is needed for the upcoming steps.
Authorize your remote users for Azure VPN
3. Go to https://portal.azure.com and open your Enterprise Application App called “Azure VPN” on (1) Azure Active Directory 🡪 Enterprise Applications 🡪 (2) All applications 🡪 (3) Search for Azure VPN and click on it (4)
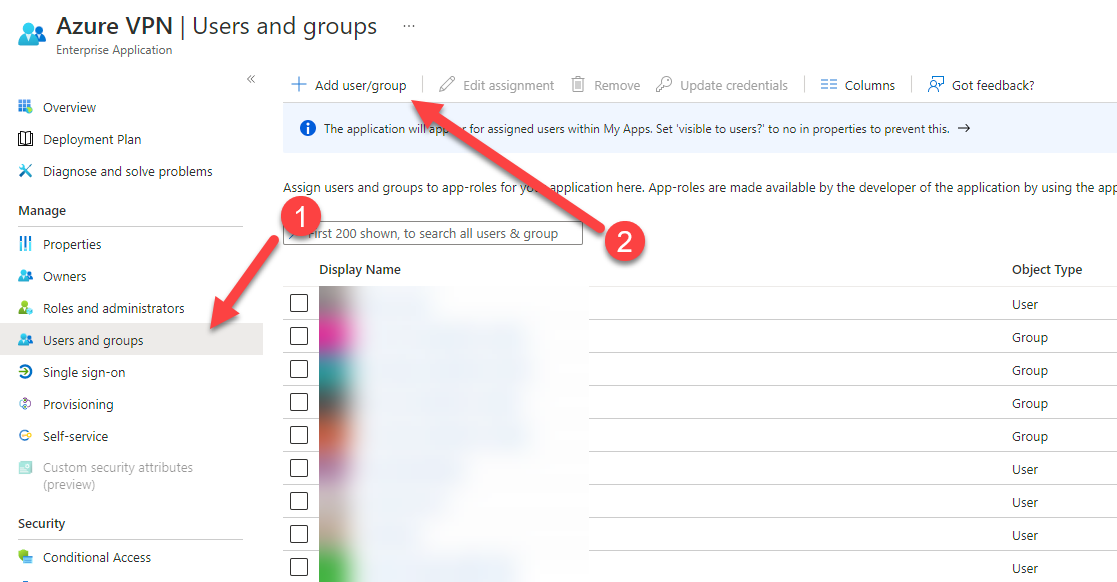
4. After you have opened the Azure VPN Application click on (1) Users and groups 🡪 (2) Add user/group 🡪 Add the users or groups you wish. In my example I have created a dedicated Azure AD Group for the VPN Users. You can assign a synchronized group as well
Conditional Access for MFA
If you have Azure AD Premium P1 licenses assigned to your users, you can use the conditional access to control MFA or block certain users of an included group. For example: You have assigned a global group for the use of Azure VPN. You need to temporarily block some users. You can build a conditional access policy like this. More interesting is the capability to control multi-factor authentication with conditional access. In the following example we create an MFA policy, which forces the users to satisfy MFA for using Azure VPN. Users will be prompted to authenticate again if the users were idle and disconnected for more than one hour.
5. Go to Azure AD Directory 🡪 Security 🡪 Conditional Access under the Protect section.
6. Click on “New policy”
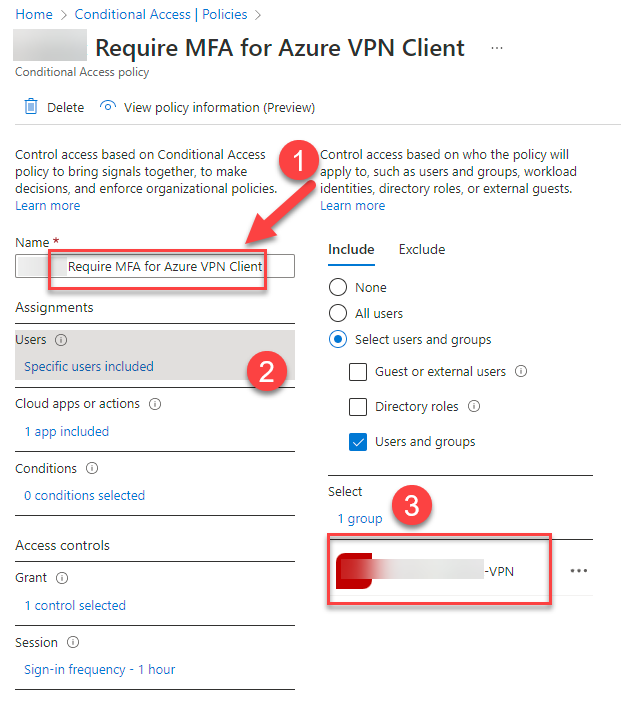
7. Give the policy a logical (1) name and click on (2) “Users” and declare the (3) VPN group containing your desired VPN users
8. Click on “Cloud apps or actions” and add the “Azure VPN” Application 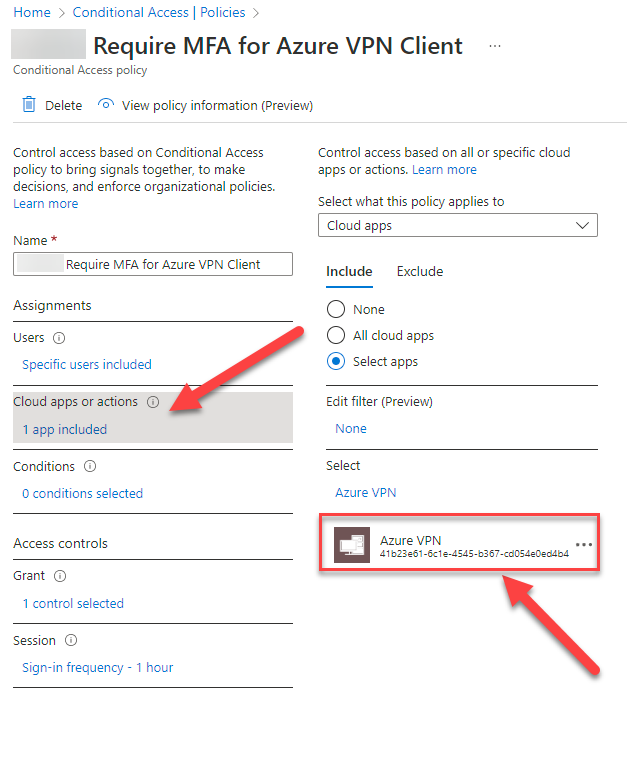
9. Click on “Grant”. The left pane opens where you can click on “Require multifactor authentication” under “Grant access”.

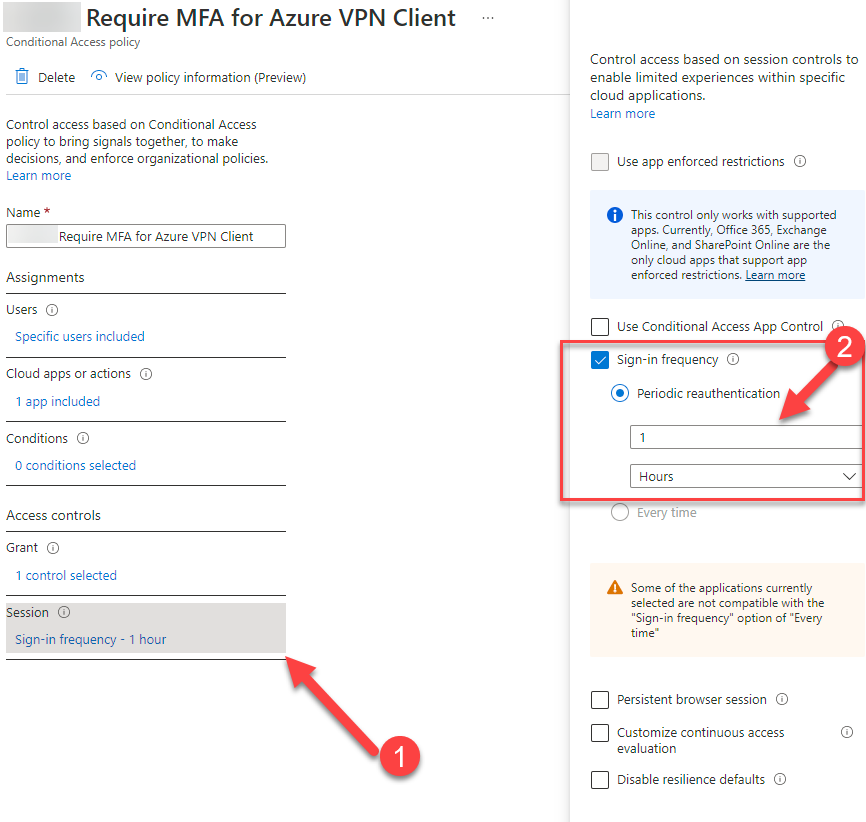
10. Hit the last section (1) “Session” and check the box (2) “Sign-in frequency”. We use the following parameters: Periodic reauthentication after 1 hour
Now we successfully have setup the conditional access policy to gain tremendous security.
Create the Virtual WAN backend
The preparation is done for the Azure AD Authentication. Now we need to create our VPN environment. Within the Virtual WAN we can create our hubs in each region. Every hub in the virtual WAN is any-to-any connected and can talk to each other. But first we need to create our Virtual WAN which is holding all together.
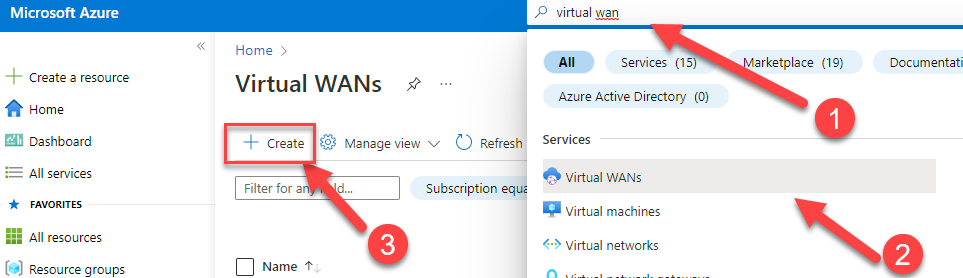
11. Search for (1) Virtual WAN in the search box and hit (2) “Virtual WANs” click on (3) “Create”
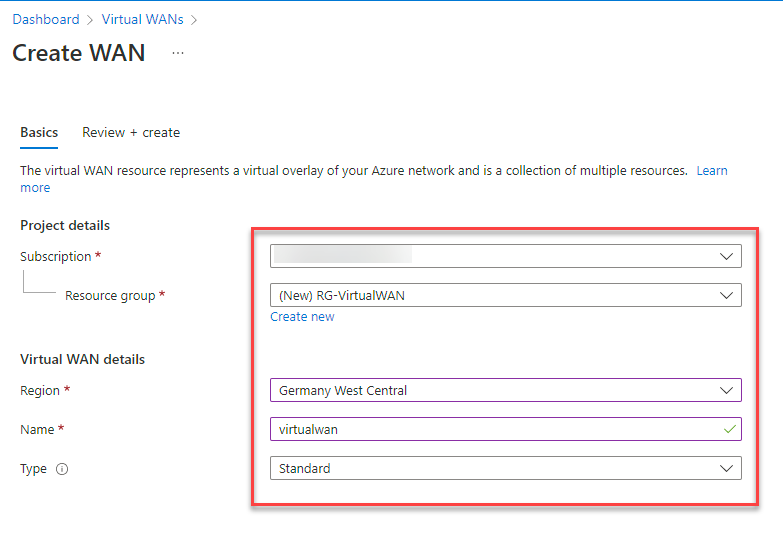
12. Configure the following settings:
Subscription: The subscription for billing the virtual wan
Resource group: Your logical container. For example, “RG-VirtualWAN”
Region: The region where you want to place your hub which connects your remote users.
Type: Standard – Only with the standard SKU you can use Point-to-Site VPN. The basic SKU is for Site-to-Site VPN only.
Point-to-Site global multi-region user VPN Configuration
Once the Virtual WAN is created, we need the user VPN config to configure our global P2S settings.
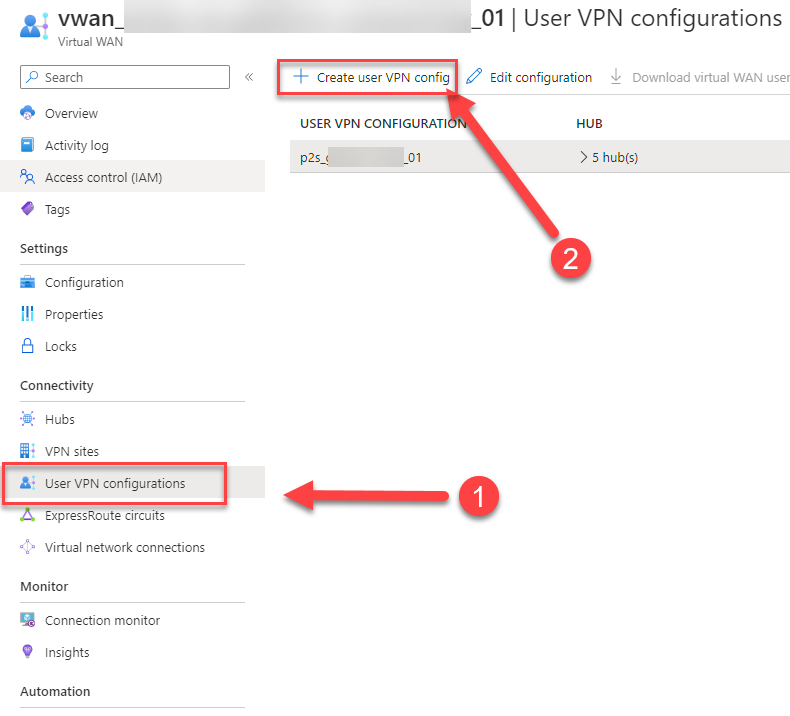
13. On the newly created “Virtual WAN” go to (1) “User VPN configurations” and (2) “Create user VPN config”.
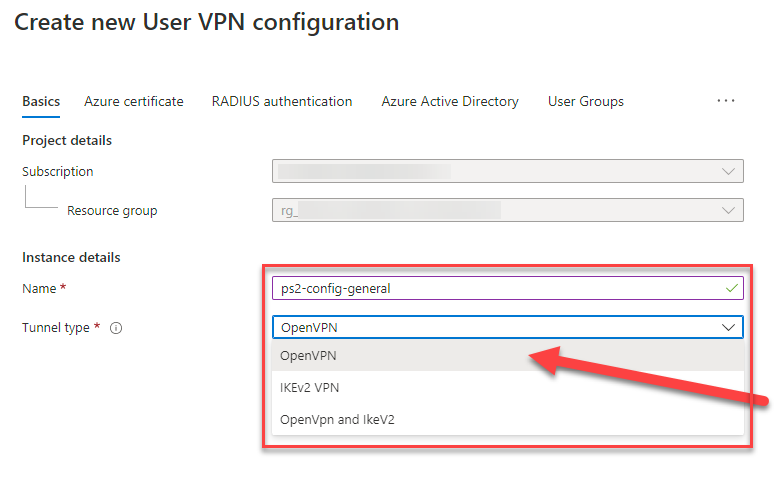
14. Give it a logical name and declare the tunnel type “Open VPN”. Only with OpenVPN you can use the Azure Active Directory Authentication.
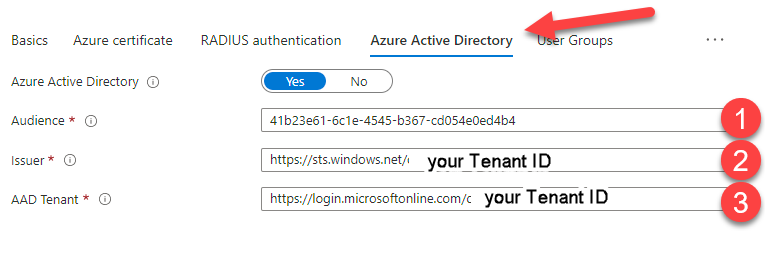
15. Click on “Azure Active Directory” and configure the following settings:
Azure Active Directory 🡪 Yes
- Audience: 41b23e61-6c1e-4545-b367-cd054e0ed4b4 (Enterprise App ID from step before)
- Issuer: https://sts.windows.net/**************************/ (Replace the stars with your Tenant ID – do not forget the trailing slash at the end)
- AAD Tenant: https://login.microsoftonline.com/*********************** (Replace the stars with your Tenant ID with no trailing slash at the end)
You can find your Tenant ID on Azure Active Directory 🡪 Overview 🡪 Tenant ID
16. Click on ![]()
Create the first hub
For the next step we deploy our hub which will represent the point-to-site VPN Gateway.
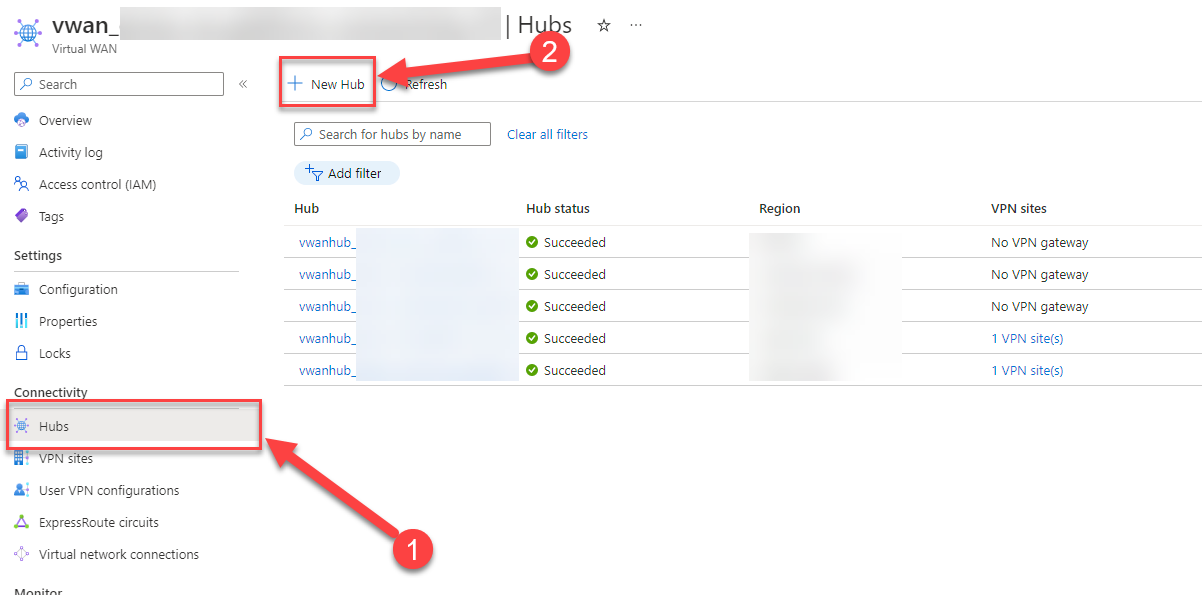
17. Click on (1) “Hubs” and then (2) “New Hub”
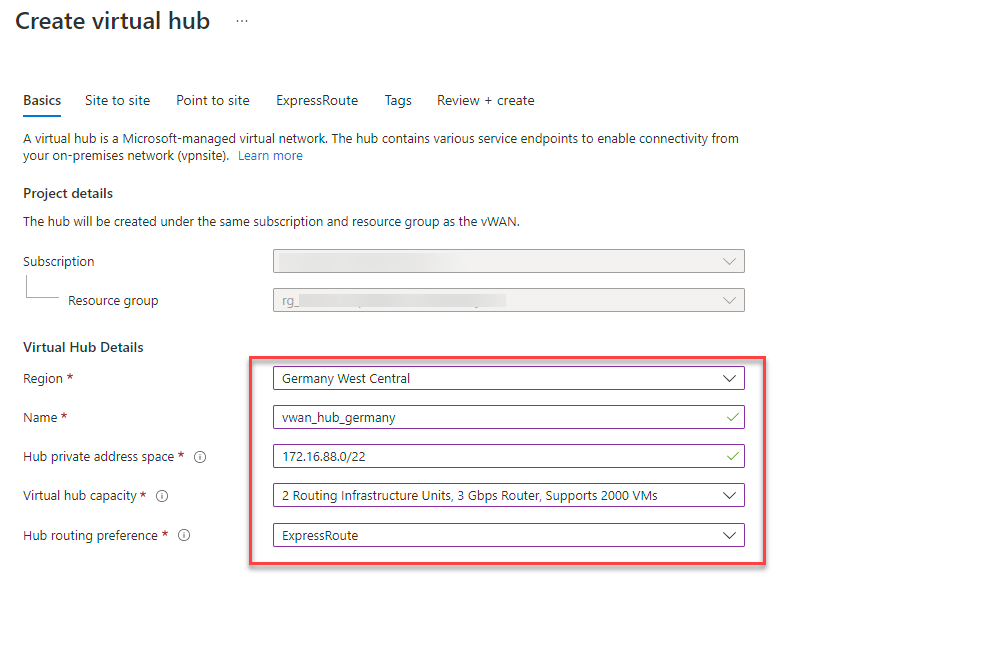
18. Configure the following basic settings:
Region: The region where you like to deploy your hub and the point-to-site VPN gateway. Here in Germany West Central.
Name: The name by which you want the virtual hub to be known.
Hub private address space: The hub’s address range in CIDR notation. The recommended Virtual WAN hub address space is /23. Virtual WAN hub assigns subnets to various gateways (ExpressRoute, Site-to-site VPN, Point-to-site VPN, Azure Firewall, Virtual hub Router). For scenarios where NVAs are deployed inside a virtual hub, a /28 is typically carved out for the NVA instances. However, if the user were to provision multiple NVAs, a /27 subnet may be assigned. Therefore, keeping a future architecture in mind, while Virtual WAN hubs are deployed with a minimum size of /24, the recommended hub address space at creation time for user to input is at minimum /23. We take a bigger one /22.
Virtual hub capacity: Routing infrastructure units determine the minimum throughput of the Virtual WAN hub router and the number of Virtual Machines that can be deployed in Virtual Networks connected to the Virtual WAN hub. Two routing infrastructure units are included at no extra cost with a deployment of a hub. The minimum is totally sufficient for this setup.
Hub routing preference: Preference used in selecting best path when the virtual hub learns multiple paths to the same destination route-prefix. For the local offices an express route is planned for this setup. (Not part of this guide)
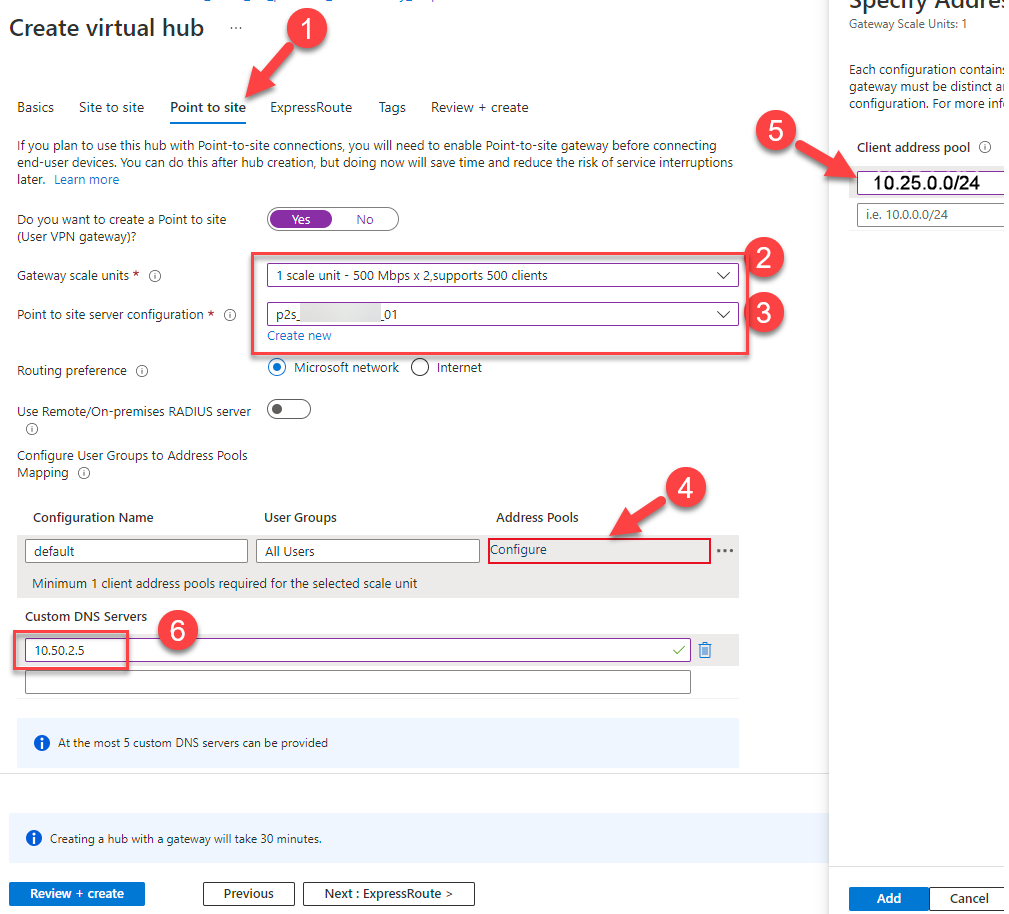
19. Configure the following point-to-site settings:
- Click on “Point-to-site”
- Take the first scale unit which is sufficient for us
- Pick up the recently configured p2s VPN configuration
- Hit the “configure” button to open the client adress pool option
- Declare the client adress pool for the VPN clients. Regarding the architecture we take 10.25.0.0/24 and click on “Add”
- Declare a regional custom DNS Server, if you have one.
Click on Review+Create and let it building up your first hub.
Create the second hub
In this setup we are using at least two hubs so show one of the strongest capabilities of this setup. Connecting to the nearest VPN gateway independently wherever the user is located.
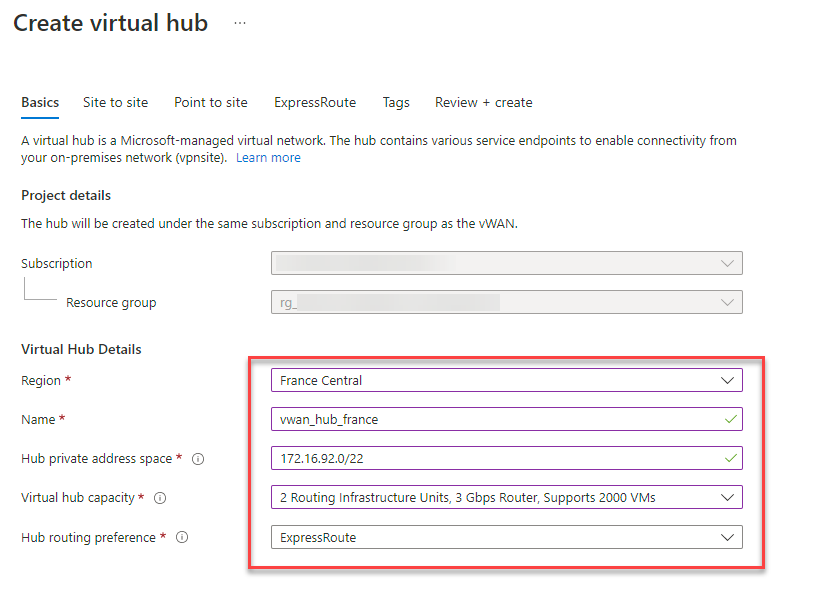
20. Configure the following basic settings:
Region: France Central
Name: vwan_hub_france
Hub private address space: We take another /22.
Rest remains the same
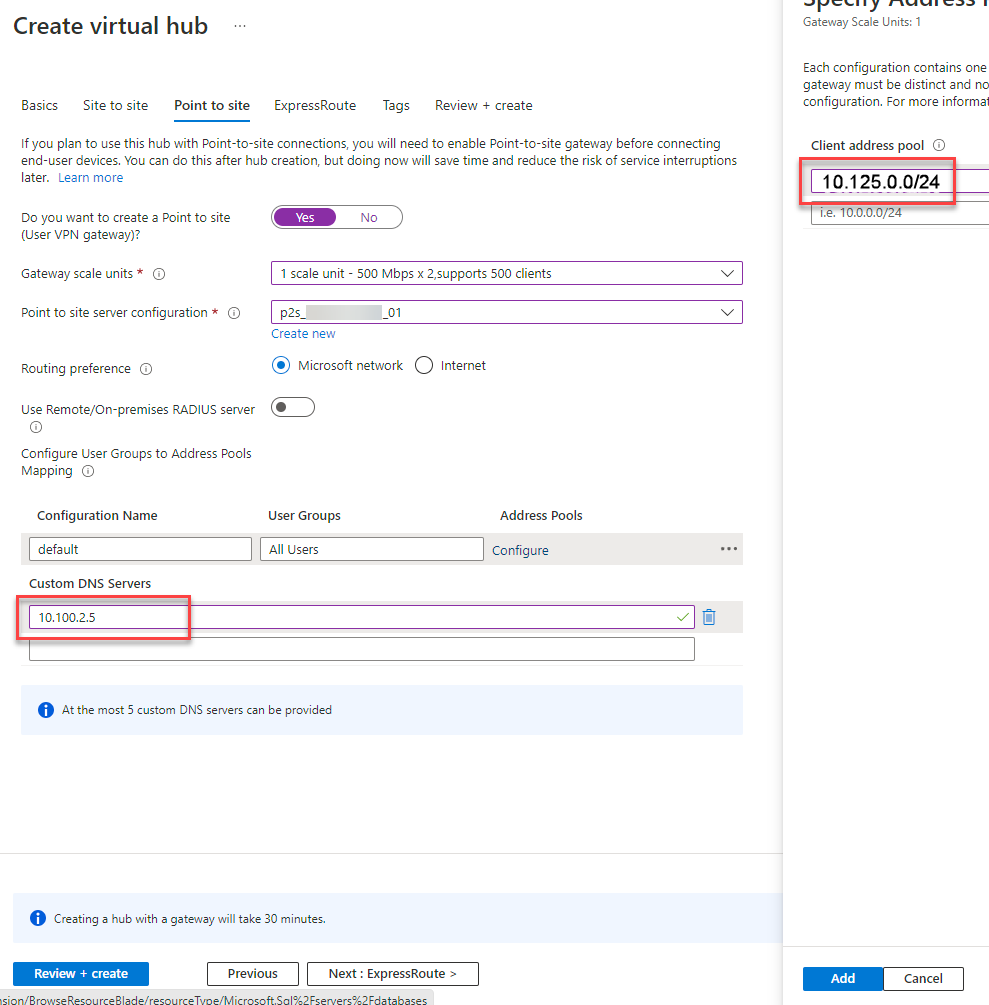
21. Configure the following point-to-site settings:
I will highlight only the differences here:
- Declare the client adress pool for the VPN clients of the second region. Regarding the architecture we take 10.125.0.0/24 and click on “Add”
- Declare a regional custom DNS Server, if you have one. Here we take “10.100.2.5”
Connect the hubs with your VNETs
We have successfully created VPN Gateways for the remote users. Now we need to integrate our hubs into the VNETs. Within the connection options we can deploy custom route tables as well to route our traffic through the regional NVAs. The VNET connection will create a peering between the hub and the VNET.
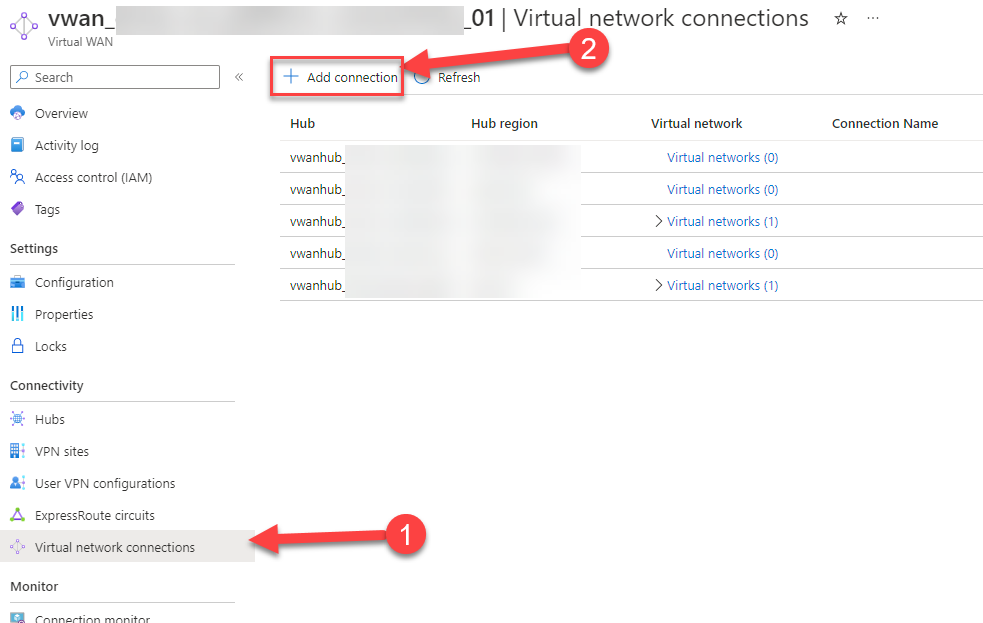
22. On the created Virtual WAN click on (1) Virtual network connections and then on (2) + Add connection
23. Configure the following settings:
- Connection name: Give it a logical name like “connect_vwan_hub_germany”
- Hubs: Select the hub you want to associate with this connection. “vwanhub_germany”’
Resource group: Select the resource group that contains the virtual network to which you want to connect. - Virtual network: Select the virtual network you want to connect to this hub. The virtual network you select can’t have an already existing virtual network gateway. Select VNET1, if you have created one with the same settings.
Propagate to none: This is set to No by default. Changing the switch to Yes makes the configuration options for Propagate to Route Tables and Propagate to labels unavailable for configuration. - Associate Route Table: We can associate it with the default route table or to none because there was no custom route table created before. We associate it with the default route table.
- Propagate to Route Tables: Click on it to propagate it to our existing two hubs (6).
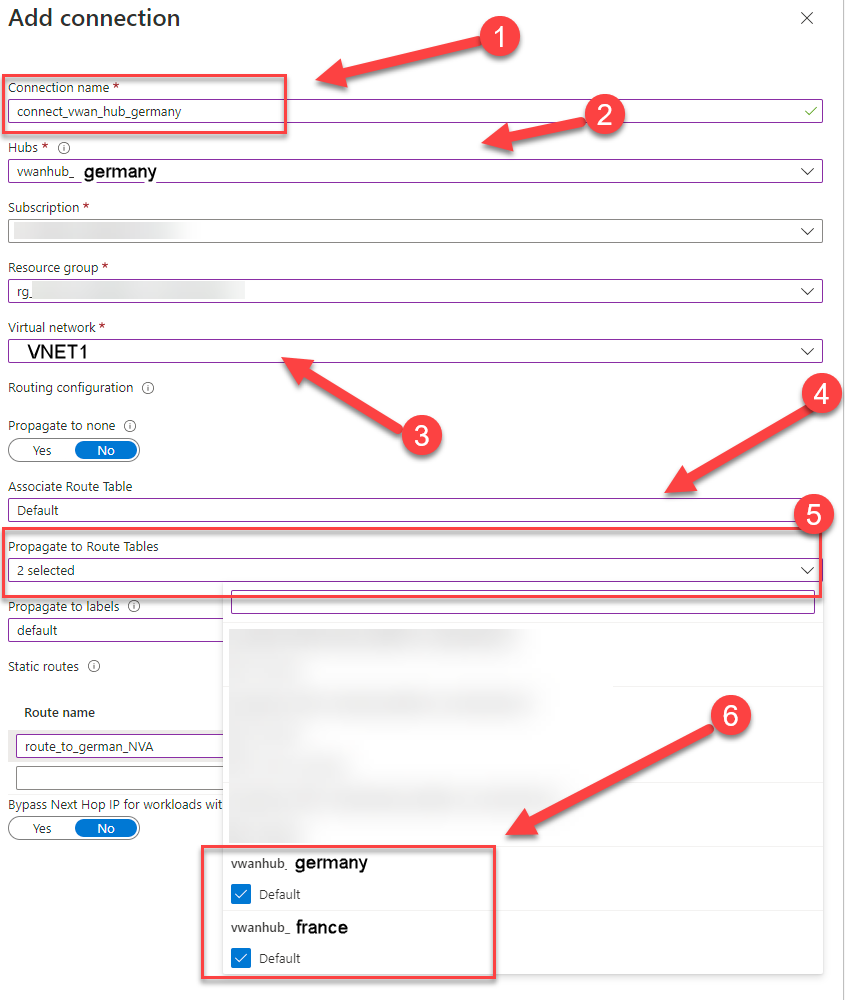
24. Add a static route:
Route name: route_to_german_NVA
Destination prefix: 10.50.0.0/16
Next hop IP: The IP of the NVA 10.50.1.6

25. Click on Create
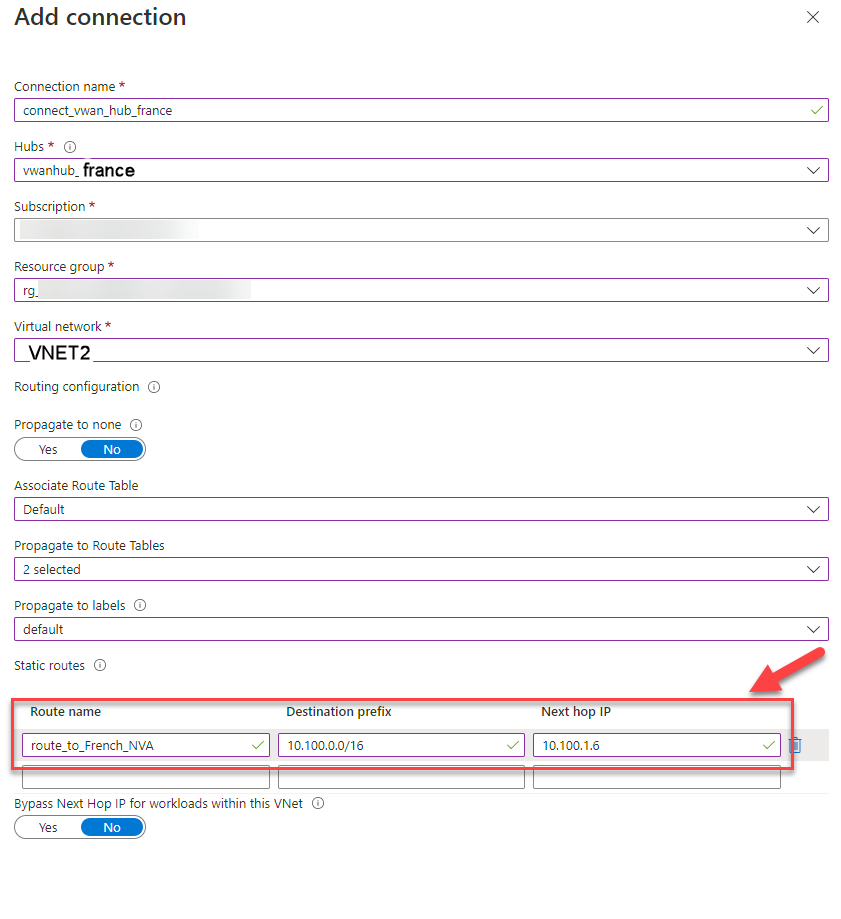
26. Add a second connection and configure the following settings:
- Connection name: Give it a logical name like “connect_vwan_hub_france”
- Hubs: Select the hub you want to associate with this connection. “vwanhub_france”’
Resource group: Select the resource group that contains the virtual network to which you want to connect. - Virtual network: Select the virtual network you want to connect to this hub. The virtual network you select can’t have an already existing virtual network gateway. Select VNET2, if you have created one with the same settings of the architecture.
Propagate to none: This is set to No by default. Changing the switch to Yes makes the configuration options for Propagate to Route Tables and Propagate to labels unavailable for configuration. - Associate Route Table: We can associate it with the default route table or to none because there was no custom route table created before. We associate it with the default route table.
- Propagate to Route Tables: Click on it to propagate it to our existing two hubs.
27. Add a static route in the second connection:
Route name: route_to_French_NVA
Destination prefix: 10.100.0.0/16
Next hop IP: The IP of the NVA 10.100.1.6
Prepare multi-region VPN Profile config for deployment
The VPN profile is a XML file with specific settings. This XML file is being deployed via Intune. Before we can deploy the XML we have to configure it. Read the steps below carefully!
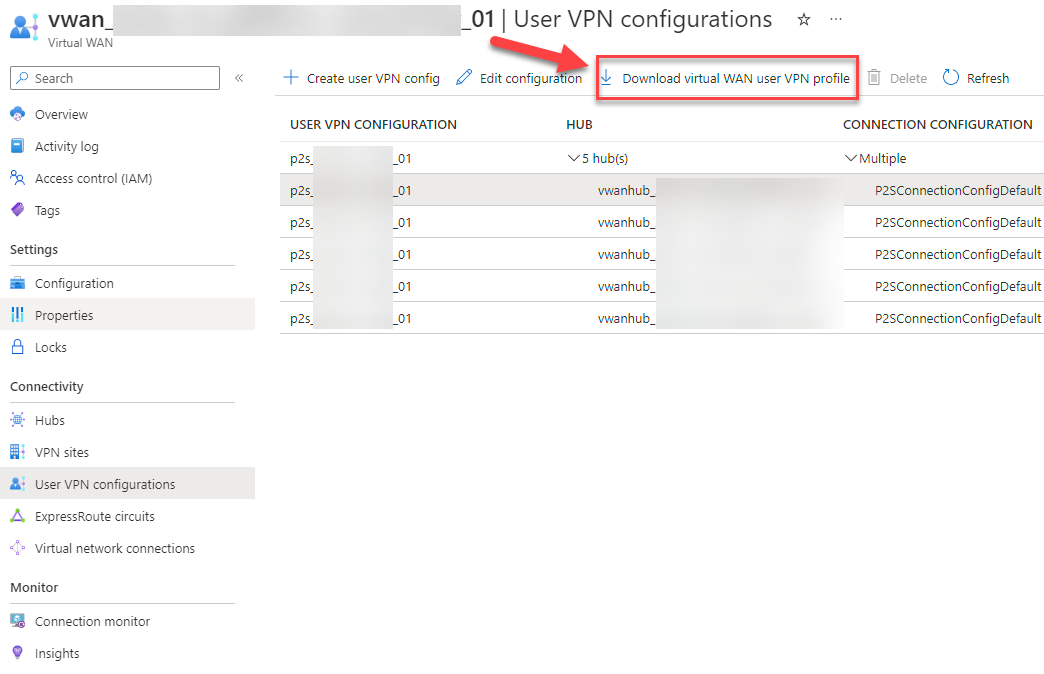
28. Download the virtual WAN user VPN profile. Go to your Virutal WAN and click on “User VPN configurations”, then click on one of the configurations and click “Download virtual WAN user profile”.
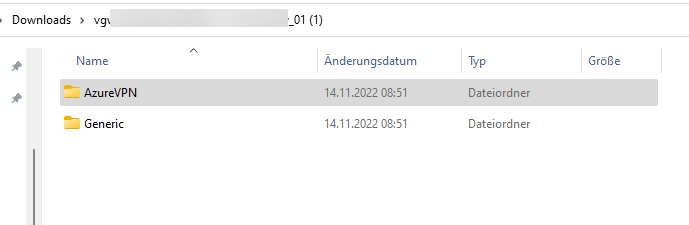
29. Unpack the .zip file where you should see the following content.
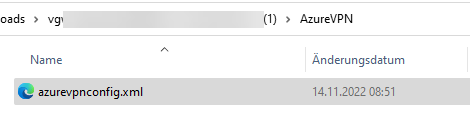
30. Go to the folder “AzureVPN” where you should see the xml file “azurevpnconfig.xml”.
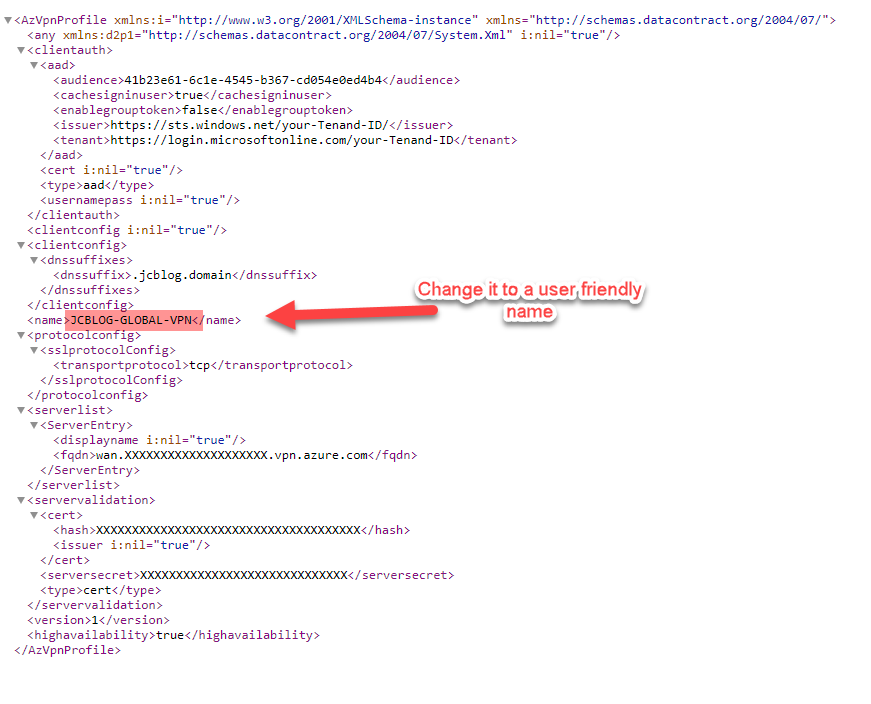
31. Right click on this file and edit the section between <name> </name> to a user-friendly name. This is what the end user sees as VPN profile.
32. We need to copy the content of the azurevpnconfig.xml file into the generic configuration like mentioned in this learn article:
Create an Intune profile for Azure VPN clients – Azure VPN Gateway | Microsoft Learn
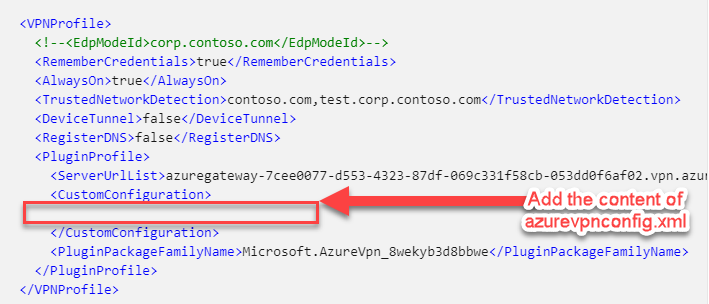
You can use and edit my example below as well
<VPNProfile>
<!--<EdpModeId>jcblog.domain</EdpModeId>-->
<RememberCredentials>true</RememberCredentials>
<AlwaysOn>true</AlwaysOn>
<TrustedNetworkDetection>jcblog.domain</TrustedNetworkDetection>
<DeviceTunnel>false</DeviceTunnel>
<RegisterDNS>false</RegisterDNS>
<PluginProfile>
<ServerUrlList>wan.XXXXXXXXX.vpn.azure.com</ServerUrlList>
<CustomConfiguration>
<AzVpnProfile
xmlns:i="http://www.w3.org/2001/XMLSchema-instance"
xmlns="http://schemas.datacontract.org/2004/07/">
<any xmlns:d2p1="http://schemas.datacontract.org/2004/07/System.Xml"
i:nil="true"/>
<clientauth>
<aad>
<audience>41b23e61-6c1e-4545-b367-cd054e0ed4b4</audience>
<cachesigninuser>true</cachesigninuser>
<enablegrouptoken>false</enablegrouptoken>
<issuer>https://sts.windows.net/your-Tenand-ID/</issuer>
<tenant>https://login.microsoftonline.com/your-Tenand-ID</tenant>
</aad>
<cert i:nil="true"/>
<type>aad</type>
<usernamepass i:nil="true"/>
</clientauth>
<clientconfig
i:nil="true"/>
<clientconfig>
<dnssuffixes>
<dnssuffix>.jcblog.domain</dnssuffix>
</dnssuffixes>
</clientconfig>
<name>JCBLOG-GLOBAL-VPN</name>
<protocolconfig>
<sslprotocolConfig>
<transportprotocol>tcp</transportprotocol>
</sslprotocolConfig>
</protocolconfig>
<serverlist>
<ServerEntry>
<displayname i:nil="true"/>
<fqdn>wan.XXXXXXXXXXXXXXXXXXXX.vpn.azure.com</fqdn>
</ServerEntry>
</serverlist>
<servervalidation>
<cert>
<hash>XXXXXXXXXXXXXXXXXXXXXXXXXXXXXXXXXXXXX</hash>
<issuer
i:nil="true"/>
</cert>
<serversecret>XXXXXXXXXXXXXXXXXXXXXXXXXXXXX</serversecret>
<type>cert</type>
</servervalidation>
<version>1</version>
<highavailability>true</highavailability>
</AzVpnProfile>
</CustomConfiguration>
<PluginPackageFamilyName>Microsoft.AzureVpn_8wekyb3d8bbwe</PluginPackageFamilyName>
</PluginProfile>
</VPNProfile>
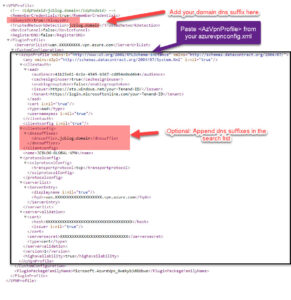
Line 5: Modify the <TrustedNetworkDetection> setting to the DNS suffix, your DHCP server is sending out to your clients. This will be used to determine if a device is connected to the internal network or external. For example: jcblog.domain
Line 9: Modify the <ServerUrlList> setting. This value can be found in the azurevpnconfig.xml file which is in the downloaded .zip file from step 29.
33. Paste the contents of the azurevpnconfig.xml file in the space between <CustomConfiguration> </CustomConfiguration>
34. Save your custom VPN profile as .XML and keep it somewhere safe!
Deploy VPN profile via Intune / Endpoint Manager
In this section we deploy the configuration for the VPN connection. The clue: In most cases you only need to deploy one unique profile for everyone on the globe. Regional settings like custom client pools, custom DNS servers or custom routes comes automically from the hub. The Azure VPN client pulls these information from the hub. This option is only available, if you have used Azure Virtual WAN. If you use multiple classic Azure VPN gateways you have to use multiple VPN profiles.
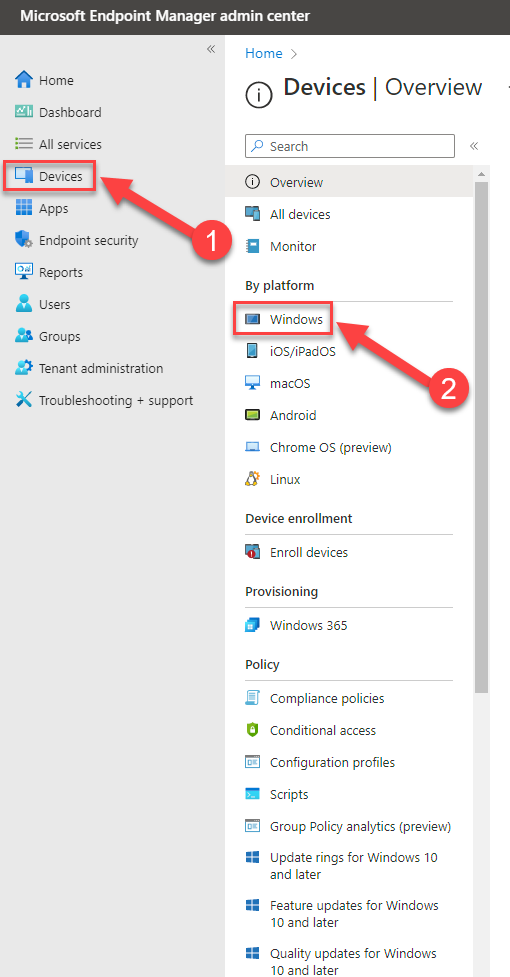
35. Switch to Endpoint Manager / Intune: https://endpoint.microsoft.com 🡪 (1) Devices 🡪 (2) Windows
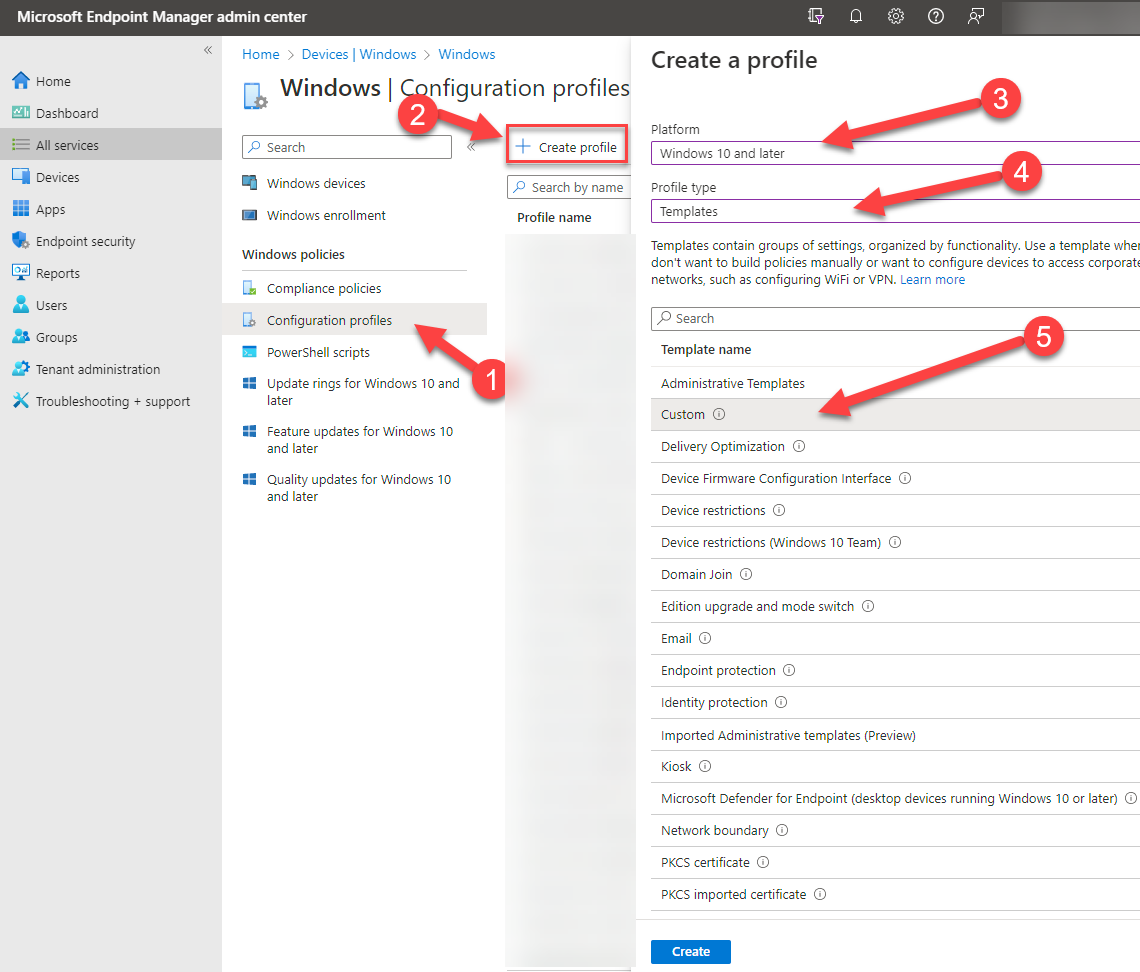
36. Go to 🡪 (1) Configuration profiles 🡪 (2) + Create profile 🡪 (3) Platform Windows 10 and later 🡪 (4) Profile type “Templates 🡪 (5) Custom
37. Give your profile a name 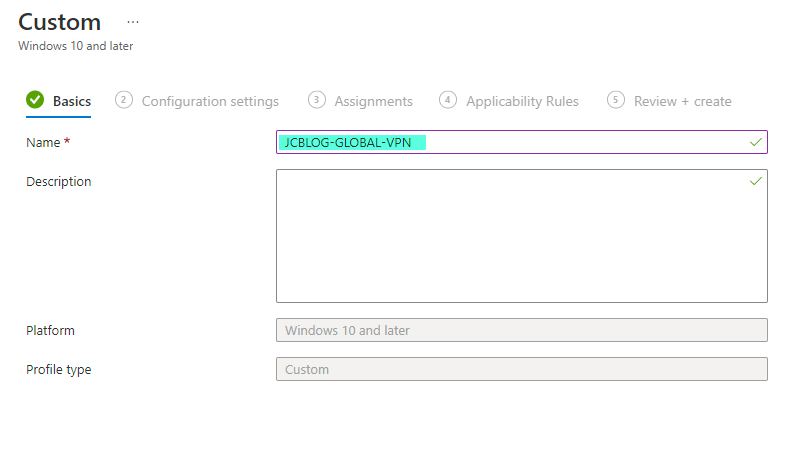
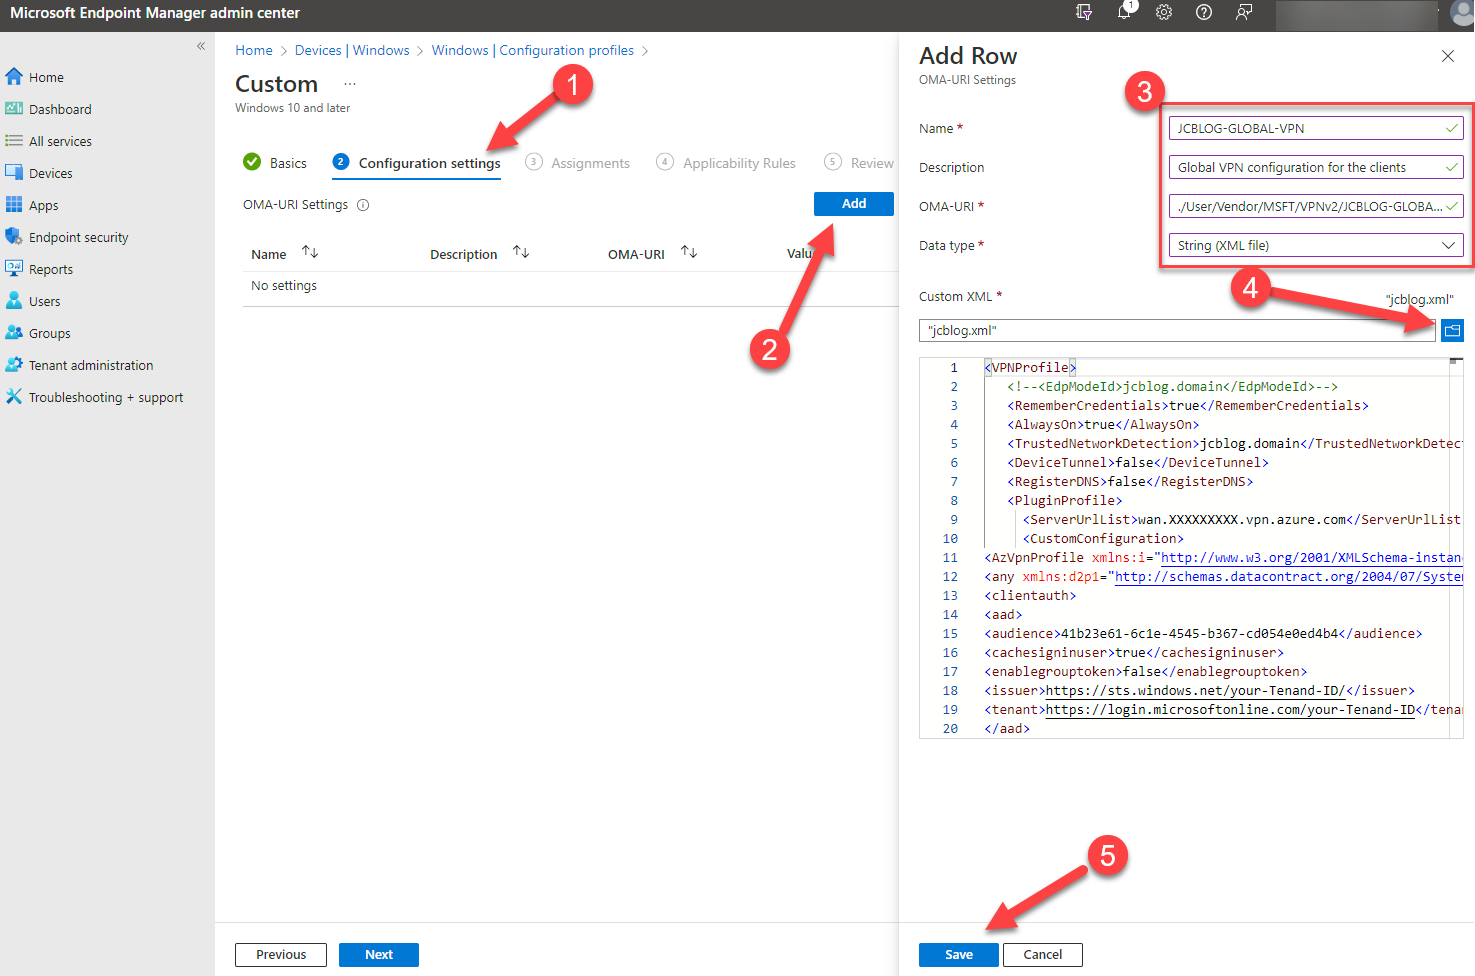
38. Click on (1) Configuration settings and then (2) Add.
Configure the following settings (3)
-
- Name: JCBLOG-GLOBAL-VPN
-
- Description: Global VPN configuration for the clients
-
- OMA-URI: ./User/Vendor/MSFT/VPNv2/JCBLOG-GLOBAL-VPN/ProfileXML
-
- Data type: String (XML file)
-
- (4) Custom: XML: Import your VPN Profile XML file created in step 35.
39. Click on (5) Save.
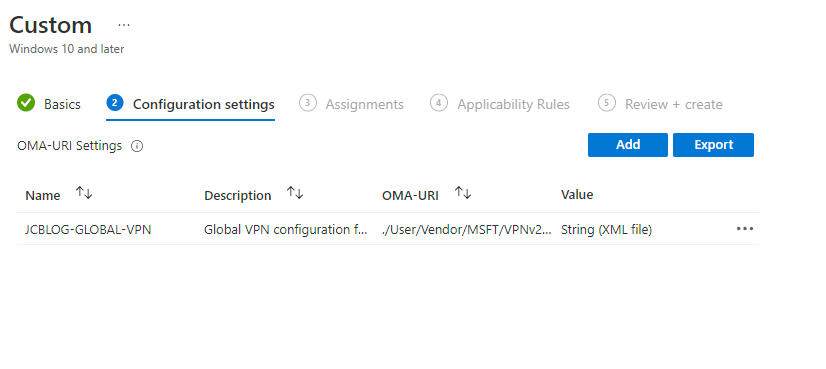
40. Verify the saved settings.
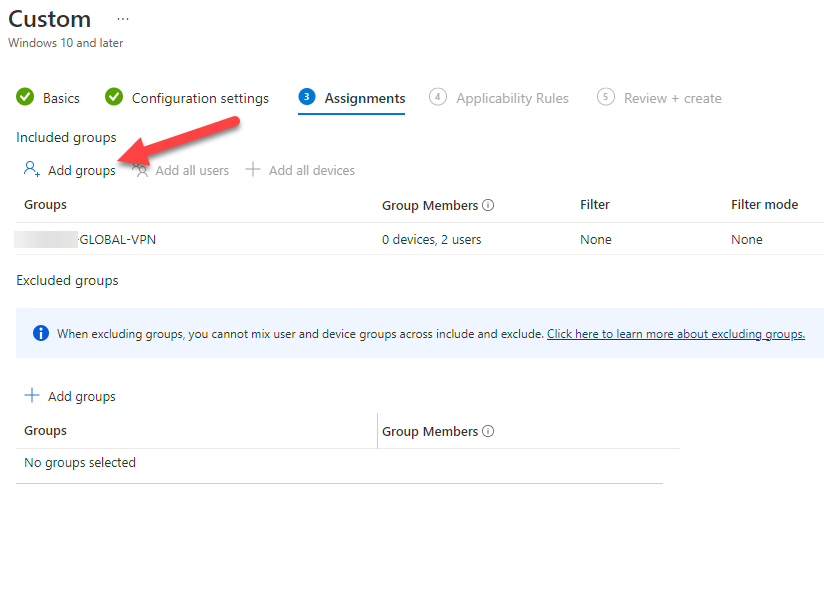
41. Assign the configuration profile to a VPN user group and continue with deploying the Azure VPN Client.
Deploy the Azure VPN client via Intune / Endpoint Manager
Now we need to deploy the Azure VPN client which is only needed to authenticate the first time. After the first authentication and MFA is done the VPN connects automatically.
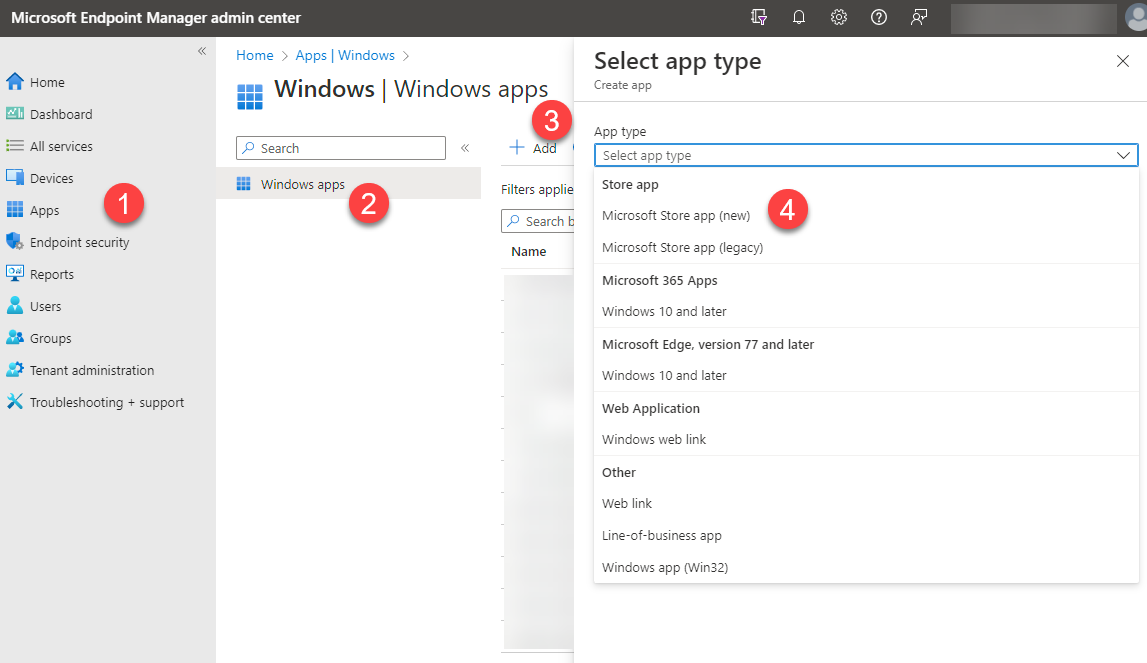
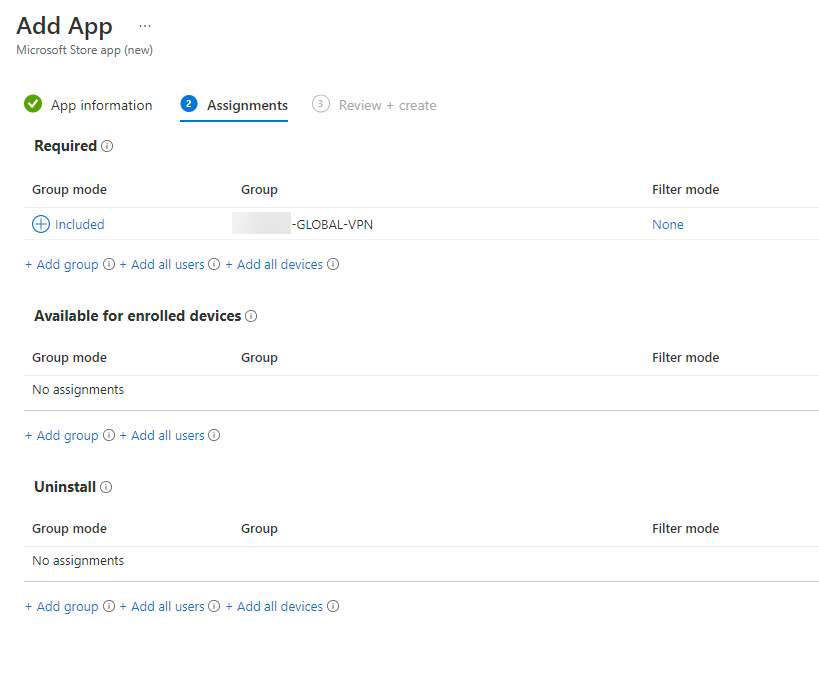
42. Go to 🡪 (1) Apps 🡪 (2) Windows Apps 🡪 (3) + Add 🡪 (4) Microsoft Store app (new)
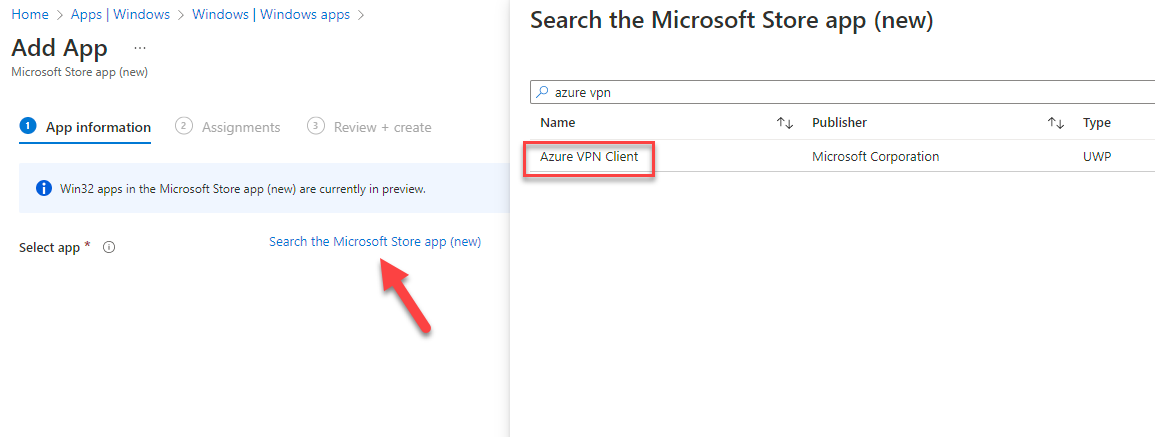
43. A new dialog opens where you need to select the app. Search for “azure vpn” and add it there.
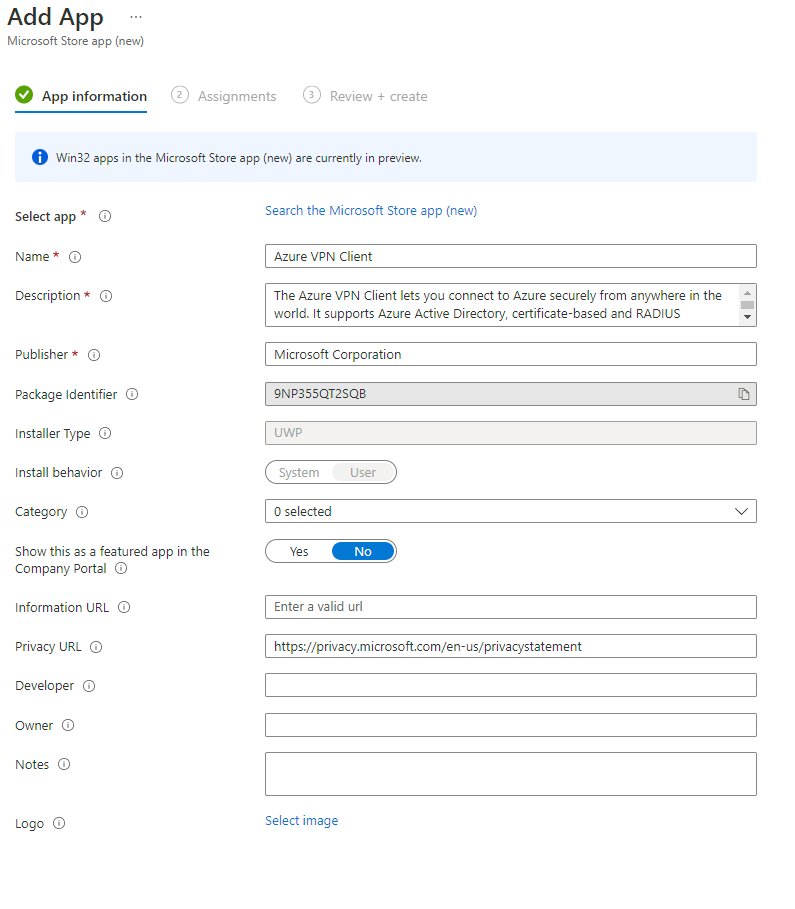
44. After you have selected the app all the information will automatically filled up. You can customize it according to your needs.
45. Assign the configuration profile to the same VPN user group you have used for the configuration and wait until the client is deployed.
Endpoint – User Experience
After the successful deployment of the Azure VPN and VPN profile to the Endpoints, the vpn user will be required to follow the following steps:
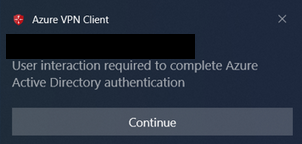
46. The user receives a popup with “User interaction required to complete Azure Active Directory authentication”. Click continue.
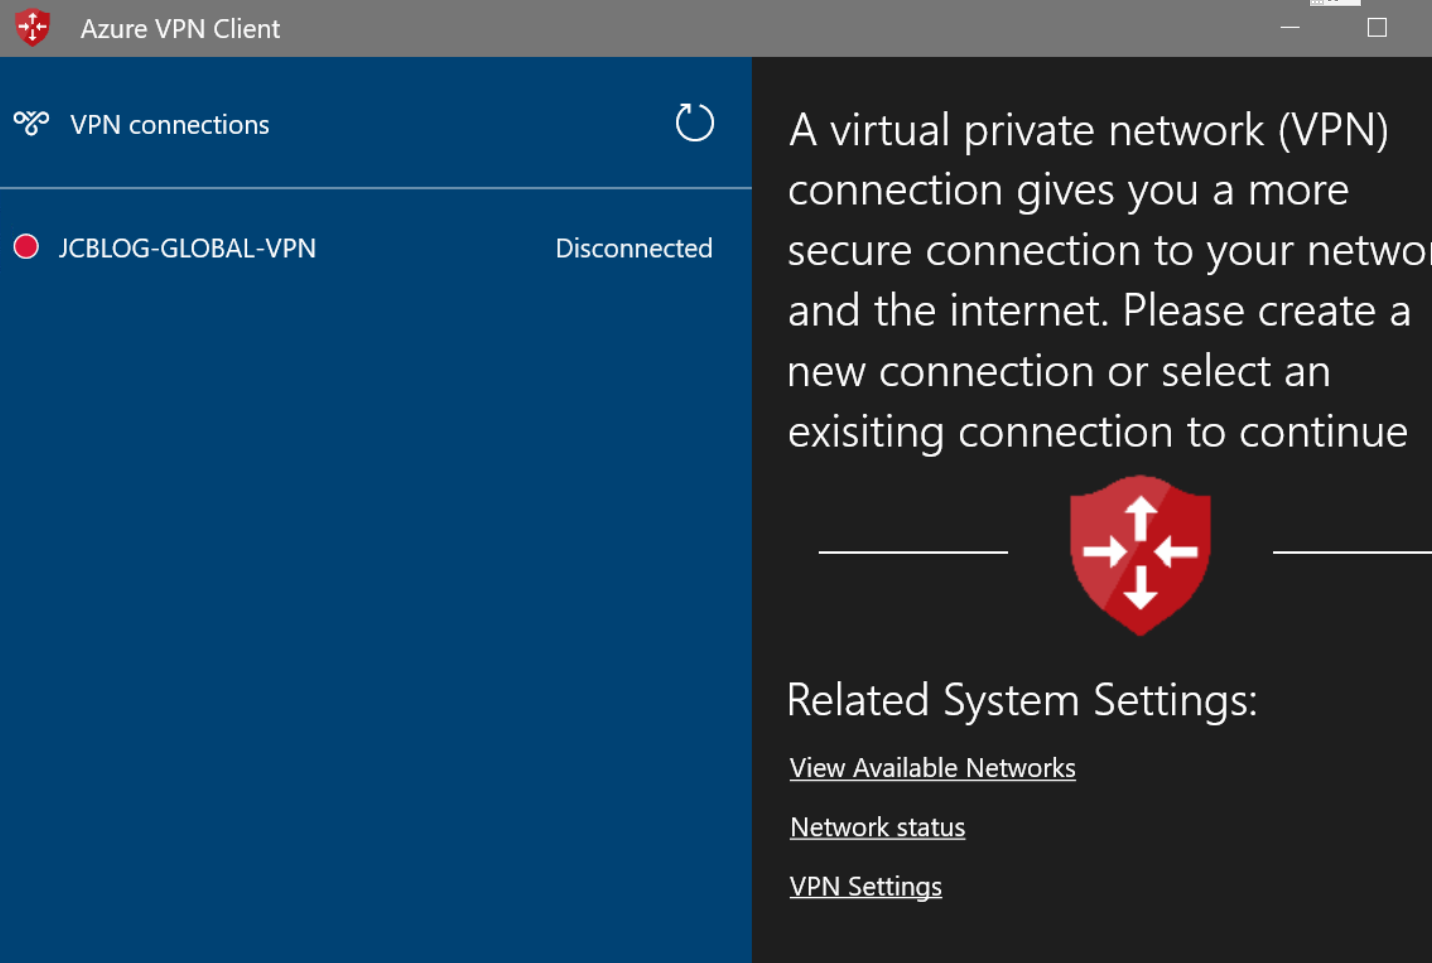
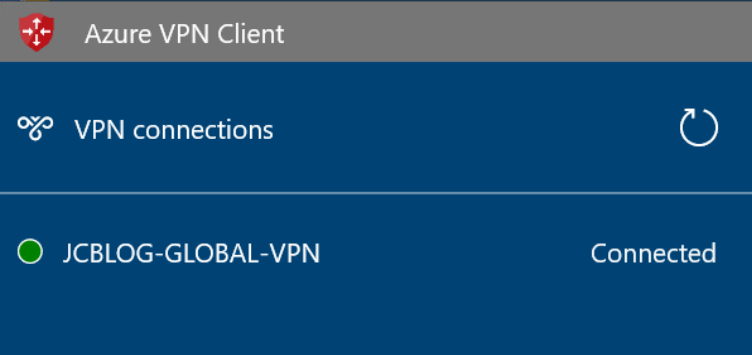
47. The VPN connection will now show up as disconnected. Click on the VPN profile “JCBLOG-GLOBAL-VPN” and Connect.
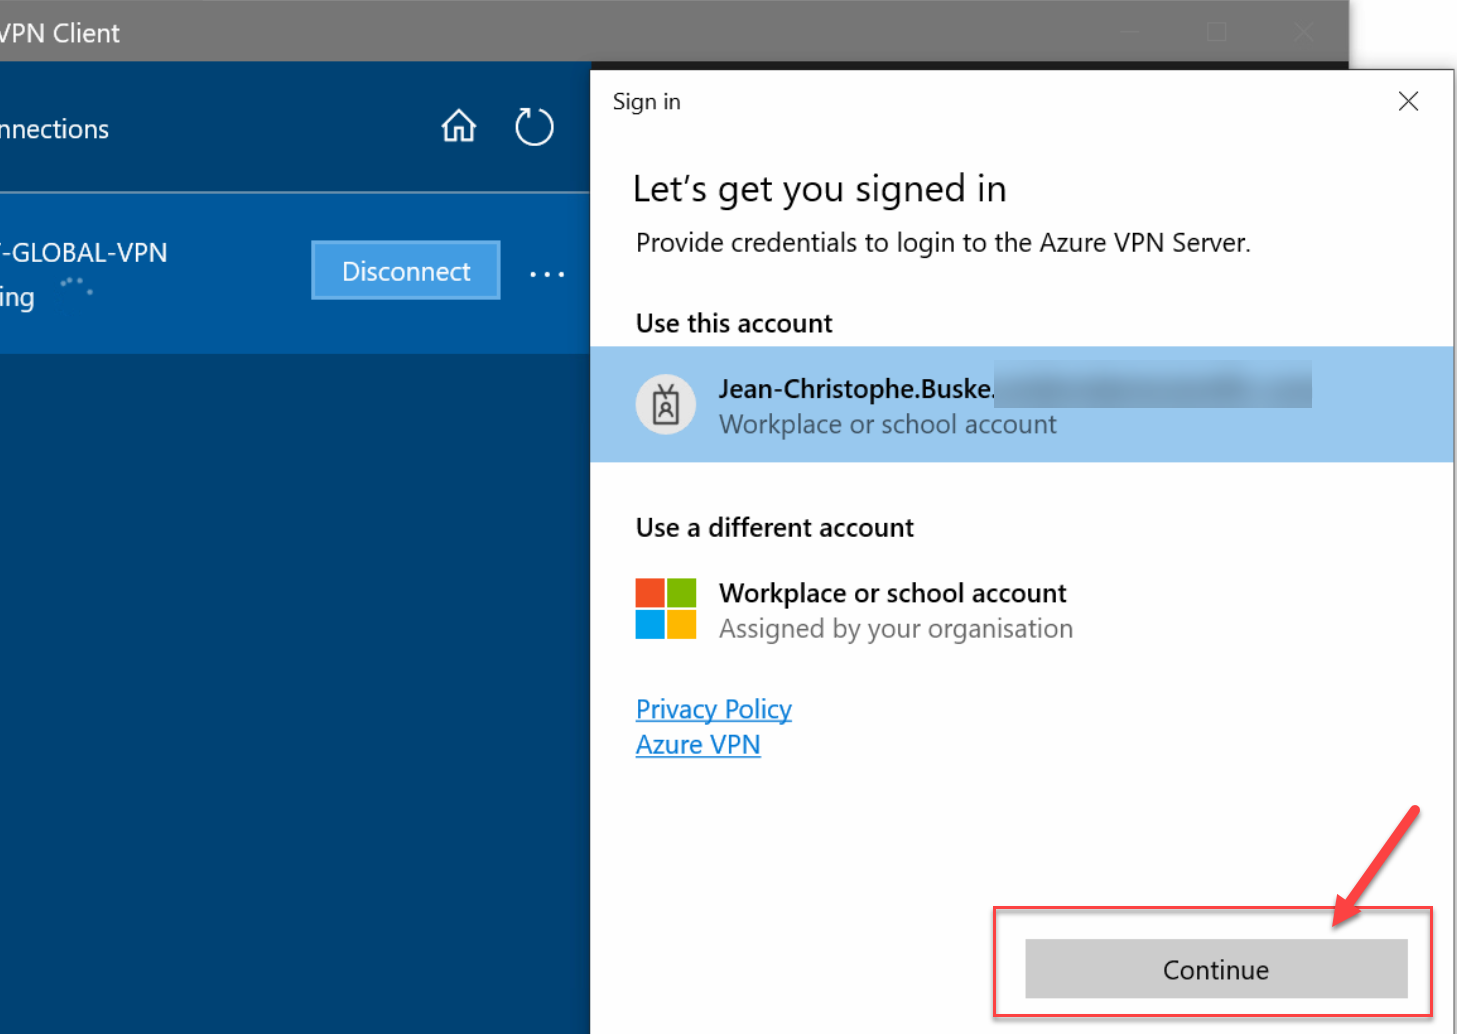
48. Select the current logged on user account. Accept the MFA request, if you have configured a conditional access policy like described in step 5.
49. After the connection will establish and stays connected. If your MFA policy is setup by reauthenticating every 90 days, the VPN automatically connects after a restart without the need of the Azure VPN client. Keep in mind that the VPN connection will disconnect immediately if your DNS suffix matches the <TrustedNetworkDetection> configured in your VPN profile.
Connection monitoring
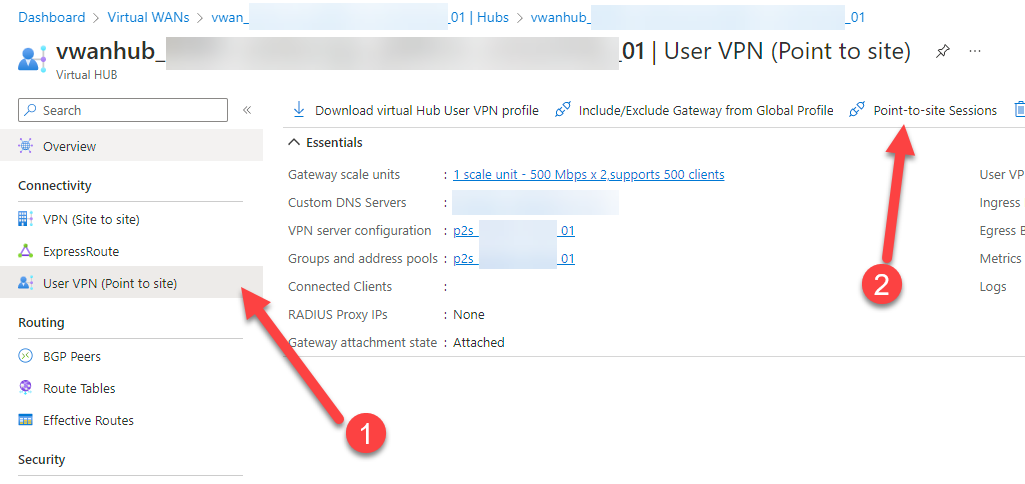
Every endpoint connected to your hub will report their current IP addresses into the Point-to-site configuration dashboard of the hub itself.
50. On the desired hub: Click on (1) User VPN (Point to site) and then (2) Point-to-site Sessions
Nice, thank you my friend
My pleasure!